Monday, November 21, 2011

My Spicy Turkey and Gravy Recipe!


**I just wanted to repost this turkey recipe.  If you're a bit daring and like to "spice" things up, this is the recipe for you!  Enjoy!**


Well, since my search for recipes was inspired by the "All-American" (or Canadian) turkey dinners, I thought I it would make sense to post "My Desi Turkey" as the first post on this page. "Desi" loosely means anything from the Indo-Pak subcontinent.

Please note, the recipe below is written for every 2 lbs of meat. So, if you have a 14 lbs turkey, multiply this recipe 7 times. You don't necessarily have to "multiply" it using a calculator but repeat it 7 times while you are adding the spices to your bowl. I just found it most convenient keeping the recipe this way.

All of these spices can easily be found in your local Indian/Pakistani grocery shop or even in the international section of your main grocery store. The soy sauce and chili garlic sauce is not actually "desi" but its from oriental cooking. You can find it in your main grocery store. The oven bag is a wonderful little thing. It works wonders and reduces your cooking time to just about 2 hours! I can't live without this. The turkey comes out juicy on the inside and crispy on the out. Just find it in the grocery section where you they carry foils, plastic wraps, etc.

Be prepared, this is loaded with spices and is not your conventional recipe.... :) You can tone down the red chili powder to your liking or just omit it all together. Enjoy!

1 1/2 tsp garlic powder, granulated
1 tsp ginger powder
1 tsp black pepper, ground
1/2 tsp salt
1/4 tsp turmeric powder
1/2 tsp red chili powder (optional)
2 tsp lemon juice
2 tsp soy sauce
1 tsp chili garlic sauce
water

1 oven bag
1 roasting pan or large foil pan

  1. Clean your turkey and remove any excess fat. Loosen the skin from the meat using a wooden spoon and carefully make deep cuts in the breast, thighs and legs. (This will allow the spices to get into the meat really well).
  2. Mix all of the above ingredients in a bowl except for water. Slowly add water until all spices become a uniformed, thick paste.
  3. Using your hands, apply the paste under the skin and into the slits and cuts. Rub the paste on the skin as well. Rub it in well.
  4. Cover and place into the refrigderator overnight.
  5. When you are ready to cook the turkey, remove it from the refridgerator and let sit.
  6. Preheat oven to 350 F.
  7. Prepare your pan and place an oven bag in the centre. Carefully open the bag and slide the turkey into the oven bag. Follow manufacturer's directions and seal closed with the provided tie. You will have to cut a few tiny slits on the top of the oven bag for steam to escape.
  8. Place in the oven and roast according to the manufacturer's directions. (Note: it usually takes a 14 pounder to roast to perfection in about 1.5 to 2 hrs, HONEST!).
  9. Place the roasted turkey in a nice pan, cover and place on the side.
  10. Remove the excess turkey juice from the roasting pan, discard the fat drippings and place in a sauce pan. Let simmer on stove on medium.
  11. In a small bowl, add some cornstarch with cold water. Mix until uniform.
  12. While stirring, add the cornstarch paste into the sauce pan. Cook until the gravy becomes thick and dark. Serve with your turkey!
If anyone tries this, please let me know how it turned out. You can also do this to a whole chicken and it tastes great!

Saturday, November 5, 2011

Revamped Toddler Pants

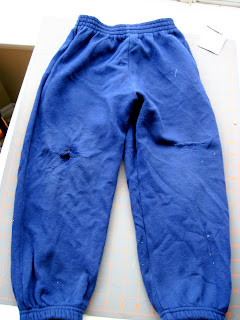
So, I have these ultra worn-down pants I'm just so very attached to. They were my son's when he was 3 years old (my 2nd child) and...umm...he's 8 now...(nothing's wrong with that though...ha, I know what you're thinking...). I guess I've been hanging on to them because of the fond memories I have of him when he was oh soooo small and cute! Well anyway, now my daughter (my 3rd child) is about that age now and I thought I was time to revamp these for her.


These pair of pants look like they are in really bad shape...well they are...in really bad shape. But I thought I would still give it a go and see what happens. Keep in mind that I loved these pants so much that I had my son wore them frontwards and backwards...so, there are knee holes on both sides. Yikes! I know what you thinking but just watch what I can do to it! And if you're like hanging on to those no-so-lovely-full-of-memory-type-of-clothes, you can do it, too! So follow along and I'll let you in on how to extend the life of these nearly-impossibly-revampable munchkin pants.


First, I chopped off the elastic ends of the bottom of the pants. They had to go...too old school! Then I simply hemmed the bottoms with a contrasting zigzag stitch to add some visual appeal.


Then for a nice feminine touch, I decided to create heart-shaped applique knee pads. I sketched one side of a nice rounded heart on the fold of a paper. I made it large enough to cover those nasty holes and a bit more for durability. Cut out that template.


I placed the template on the worn-down knees to ensure it covered the entire area plus about 1 1/2 inch to 2 inches more around the tear.

When it all seemed good, I cut out 4 hearts, one for each good ol' hole. An easy way to do this is fold the fabric, place the template against the fold and then cut. I repeated this 3 more times.

Here's my lovely heart. I just love hearts! There sooo sweet and cute.

I cut a wide strip of interface, enough to cover all 4 of my hearts.

I then placed a large scrap piece of fabric, laid down the hearts right side down, covered it with interface and pressed with a medium heat iron. (Another way to do this is place your uncut fabric wrong side and interface glued side together, press and then cut out your shapes. This would be better but I was a little impatient and wanted to see the lovely hearts on the pants first...sorry...If you look at my applique tutorial on my Beginner Sewing Techniques page, you'll find the real technique). Anyway, I peeled off the interfaced hearts from the scrap fabric before it cooled.

And, it should look like this right side up.

Now after that, I cut out all the hearts.

Here they are! Aren't they lovely??

I placed the hearts on the hole and carefully pinned them down using straight pins.

Here comes the fun part....(like my yarn? So do I!).

I took colourful yarn and applied it to the edge of the hearts as I zigzag stitched along and around the hearts. Isn't that a neat idea? It adds enough colour for the applique to pop out!

I snipped off the yarn and I'm done one knee! Yeah! After that, I just repeated the steps again for the remaining 3 knee pads.


How do you like the finished look? Ok, so it's not professional or anything but its great for another season of playwear...until it'll be time to say goodbye for good. Oh, why do our munchkins have to grow up so fast?

Monday, August 1, 2011

Ramadan Mubarak Everyone

Ramadan Mubarak everyone! Ramadan is the name of the holiest month in the Islamic Calendar. The Islamic calendar is based on the phases of the moon. This is the time of the year in which all Muslims of teen and adult age must fast for 30 days from dawn (sunrise) until dusk (sunset). They must increase their good deeds and worship during this month and continue the habit for the rest of the year until Ramadan comes again. It's a time for spiritual renewal and awakening as busy lives and obstacles may distract us throughout the year.

With Ramadan right in the middle of summer, I thought I would post a simple but refreshing recipe for a yogurt salad I love eating at iftar (the meal we eat to break our fast at sunset).

This "salad" is called Bhoondi and it's made up of tiny deep fried gram (chickpea) flour balls, fresh yogurt and some Chaat Masala (a melody of spices great for savoury indo-pak snacks).
You can find the Bhoondi and Chaat Masala at your local South-Asian grocery store or regular grocery stores have started to carry it as well in Toronto, Canada.


Here are the brands that I use. Shan for the masala and Surati for the bhoondi. All you need are the following:

1 pkg Bhoondi
1 tub yogurt (2% MF or more)
1 box Chaat Masala (Shan is best)
optional finely chopped coriander (cilantro)

1. Fill a deep bowl with bhoondi. Slowly add warm water until all the bhoondi are submerged in the water. Let sit for 10 minutes. Then drain the water.

2. Add 1 1/2 cup of yogurt to the bhoondi. Stir until all bhoondi are coated in yogurt. If it seems too dry, add more yogurt. The texture should be as pictured below.

3. Add desired amounts of Chaat Masala (kind of like salt, add to taste!). If you are not fond of foods that are too spicy, simply sprinkle a pinch or two. If you want to be daring, please add more!

4. For garnish, add chopped coriander to the top of the dish.

5. Serve immediately (it should be slightly cooler than room temperature). Refrigerate any leftovers...if you have any!

TIP: You can also add finely chopped tomatoes, green chilies, canned chickpeas to the entire mixture for added flavour and texture. Also, if one full pkg of bhoondi is too much for you, simply make half of the pkg. Save the other half for another day.

ENJOY! It's really refreshing on a hot summer day.


Saturday, July 30, 2011

Earlier Gift for My Niece


I forgot to post these pictures up. I made these before the ones posted yesterday. I sewed them when my niece was born. I love how the colours all tied up. The bib is reversible and the pattern is now available in my shop. You can sew it with the bias tape binding or without. Both options are included in the package. The booties are too cute. I plan on creating a pattern for that too so stay tuned. I sewed on some bright buttons for added cuteness!


Here is a close up of the dress. Very simple pillowcase dress. The buttons tie up all the accent colours and brings them out.


Little booties. I think I made them a tad bit too small so they may just have to be hung from the rearview mirror in her parents' van or over my niece's bed on the wall. I have to sew a larger pair. It was my first time sewing booties so I have to adjust the size. Maybe I'll make the pattern for this too...someday!

Friday, July 29, 2011

Relief and Some Sewing Fun

Phew, there's finally been some relief from the crazy heat wave last week. In celebration of the great (and much cooler weather), I decided to sew some little clothes for my munchkin neice. She is just about 2 months old and is the most cutest baby ever (well, I think all babies are the cutest ever!).


Here are the first 2 dresses I sewed. The first one on the left is my absolute favourite. I added a heart applique and butterfly sleeves. I think little babies look wonderful in oversized butterfly sleeves. They look just angelic, don't you think? I added some other interesting details I will explain further in this post. The turquoise dress on the right is a simple peasant dress with embroidery from my sewing machine and a medium sized flower made of this ruffle lace my aunt gave me.


Here is a close up of the turquoise dress. You can see that I just created a spiral with the lace ruffle and it made a pretty cute flower. I hand stitched it to the dress.

Here is a close up of the other dress (my fave!). I just took several scrap fabric strips I had left over from my other projects and sewed them together. Then I cut it into a heart, fused it to interface and zigzag stitched it to the dress. Voila! It's a great way of using up all those beautiful scraps you have laying around but don't have the heart to throw away (I have toooo many!). I also added my niece's name with the sewing machine.


For some added interest, I stitched on this very colourful yarn I had laying around with a simple zigzag stitch. It really helped make the dress look more uniformed and compliments the applique.

This is the back of the dress. I used red bias tape all around the neckline and sleeves to add life to the pale dress. At the end, the dress looked rather frumpy and large so I just added a strip of elastic to the center back. To hide the stitch, I added the same yarn for an interesting appeal. Oh, I also added a tiny heart on the bottom of the opening. I just love tiny details!

This is a simple skirt I sewed and jazzed up with some pink ruffle lace again my aunt gave me. For added colour, I stitched everything in a cherry red thread. I think this would look great with a T-shirt.


Lastly, a dress I sewed with some left over fabric from my sister's outfit. I added a lining to the underside of the top yoke (is that what it's called??). I made the shoulder straps about 6 inches long so that it would be easy to knot them as shown. I sewed the bottom part of the dress over the yoke (?) so that you can see a little ruffle at the top. By the way, I love ruffles!

Here's a close up. Don't you just love the colour of this dress? Overall, the dress looked kinda plain so I added a strip of scrap fabric and spiraled it the same way as the turquoise dress. This one I sewed on with a machine. Since the dress was already sewn, this was a little challenging. I would recommend you add the flowers before you sew up the panels. Or you can hand-stitch it to the dress so you have more control over the fabric. Control is good..for sewing that is!

Thursday, July 21, 2011

Sweltering Heat!

Gosh, it's getting pretty hot here! Temperatures hit about 38 C today. We're bracing ourselves for tomorrow. It will feel like about 48 C which is the first in my lifetime. We experienced temperatures like this when visiting the Middle East...and its common at times of the year. However in Canada, this is mighty rare. The worst part is that this heat wave is not going to seize any time soon. It may continue for the rest of the month and maybe continue into August as well.

Global warming and climate change has really made things different and our children will be experiencing things we have never seen before in our childhoods. We need to take action now and make major "green" steps to help this ailing planet. One day, this earth will be handed over to our children to take care of. We need to be an example for the the next generation. We need to become proactive.

Sunday, July 17, 2011

Super Duper Easy Chili Recipe

Ok, here's the chili recipe I promised!

It's real tasty and is delicious topped with sour cream and cheddar cheese. Club House is a brand found in Canada. I'm pretty sure its available in the states as well but if not, you'll probably have McCormick or something similar. For international readers, you can find chili seasoning at your local grocery store which would sell North American items (hopefully!) OR buy it online!

So, here's what you need:
1 lb ground beef
1/2 cup green and red pepper, finely chopped
2 stalks green onions, chopped
4-6 Tbsp Club House Tex Mex Seasoning (
2 cups canned crushed tomatoes
1/2 cup water
1 cup canned red kidney beans, drained (omit if your kids don't like it)
salt to taste

1. Cook ground beef until browned. Add desired amount of chili seasoning, chopped peppers
and onions. Stir frequently and cook until peppers have softened.
2. Add crushed tomatoes, water, beans (optional), and salt to taste.
3. Bring mixture to boil, reduce heat and cover. Simmer for 10-15 minutes until chili
thickens slightly. Stir frequently. Serve warm.

Serve with shredded cheddar cheese, a dollop of sour cream (low fat if you wish), and freshly chopped cilantro (also known as coriander).

------------------------------------------------------------------------------------

Chili Nachos Recipe

Lightly crisp tortilla chips in the oven by spreading them on a large cookie sheet. Top with shredded cheddar cheese before placing in the oven. Remove once the cheese as melted. Top with salsa, sour cream, and chili. Serve immediately!

-------------------------------------------------------------------------------------

Chili Pasta Recipe

Cook pasta according to package directions, drain and place into a deep pot. Add chili to the pot and stir until all the pasta is coated. Cover the pot with a lid for about 5 min on low heat. Turn off stove and remove from heat. Serve with cheddar cheese, dollop of sour cream, and freshly chopped cilantro. YUM!

--------------------------------------------------------------------------------------

NOTE: You will have extras so freeze in an air-tight container for those days your little kiddos aren't letting you cook and are wrapped around your leg, screaming, crying...you know those days!

Saturday, July 16, 2011

Chilli Pasta Recipe Coming Up!


The other day, I made Chilli Nachos. I must have over-estimated the amount of chilli needed because I had a lot left over. So what to do? We're not too familiar with chilli and my kids won't eat it plain....so I decided to add it to the next day's pasta rather than the typical pasta sauce. Guess what? My kids loved it and so did I! I'll be posting the recipe for the super duper easy chilli soon along with the pasta creation.

In the meantime, here's a picture of the savoury dish for you to enjoy.


(PS. Don't be surprised if your mouth starts to water just about now!)

Have a great day!


Tuesday, June 21, 2011


This is a sneak peek of what I sewed for my 2 1/2 year old for an upcoming wedding in Chicago. I was pretty impressed with the final result and plan on making the pattern on my Little Smiles Boutique online available next month!


The whole dress cost me a fraction of how much I would have spent should I have bought it ready made. And you know what? It's not that hard. You can do it, too! Can't wait to get this out in my shop. Sewing should be an empowering experience, not a frustrating one.

Here is the finished project. Let me know what you think!


Lovely colour, huh?

Friday, March 18, 2011

A Message to My Followers

Wow, I just realized I have new followers. It just amazing me that people can just find you in this vast world of cyber blogging. I guess its not so big after all. Anyway, thank you for reading this humble blog. I'm just getting in to the mode of posting so bear with me. It may not be regular at first but once I get the feel of this thing, I'll try to post more often.

Well have a wonderful day and I hope to hear from you sometime!

Monday, February 14, 2011

Meaty Chicken Lasagna


Ok so I have a confession to make. I don't really "measure" for these recipes. I don't use a standard measuring device (measuring spoons in particular). What I do use is an actual teaspoon...you know the ones we eat our cereal with. Just thought I would let you know because there is a difference. Eventually I'll convert these recipes to the standard measurements.

Just for your information, most mothers back home never measured their ingredients. I guess I picked up on those little habits...can't help it! Sorry.

1 lbs ground chicken
3 Tbsp oil
1 med onion, thinly sliced
1 tsp ginger garlic paste (or 1/2 of each, freshly minced)
1/4 tsp turmeric
1/4 tsp black pepper, ground
1/4 tsp salt (or to taste)
1/4 tsp red chili pepper (or to taste; you can omit if you wish)
1/4 tsp corriander powder
pinch garam masala
1 can/jar your favourite pasta sauce
dash Italian seasoning
12-15 lasagna noodles, uncooked (I prefer whole wheat and some spinich noodles in between)
2 cups mozerella cheese, shredded
Parmasean cheese and Italian seasoning for garnishing
9 x 11 baking pan
foil

Before you begin: Preheat the oven to 350 F
  1. Add oil to a frying pan. Add onions and saute until light golden. Then add the ginger garlic paste and fry for 2-3 minutes. Add the ground chicken and cook until the meat is white. Meanwhile, fill a large pot with water and cook the lasagna noodles according to package directions.
  2. Add all the spices and fry the meat until golden and water has evaporated.
  3. Sprinkle the ground chicken with a dash of Italian seasoning and pour in your pasta sauce. Let cook on medium until it boils, them reduce heat and let simmer for about 10 min.
  4. By this time the noodles should be done. Drain the water.
  5. In a 9" x 11" baking pan, pour a little of your prepared pasta sauce and spread. Lay down your first layer of lasagna noodles. Add sauce to the tops of each noodle and top with some cheese. Repeat until all your layers are complete. Do not top your lasagna with cheese yet. Leave it with sauce only. Cover with foil and place in the oven. Bake for 35-45 minutes.
  6. Take pan out of the oven, uncover and top lasagna with cheese. Sprinkle with a dash if seasoning and place back in the oven for 10-15 minutes until the cheese is light golden.
  7. Remove from the oven and let sit for about 10 minutes before cutting.
  8. Cut into squares and serve with your favourite steamed veggies like carrots, broccoli, green beans, etc...and some fresh salad.

    Enjoy!

Sunday, January 23, 2011

Eggy Dairy-Free French Toast


My DD2 is allergic to dairy so I came up with this very, very simple version of the typical French Toast.

2 eggs, large
2 tbsp sugar
2-3 bread slices, 100% whole wheat
oil
icing sugar, cinnamon (optional)


  1. Place non-stick pan on stove on medium heat. Place few teaspoons of oil for frying.
  2. Whip up eggs and sugar in a medium bowl.
  3. Dip bread slices one at a time. Place each slice on the non-stick pan.
  4. Cook both sides until cooked through and goldern brown.
  5. Place on a plate and sprinkle with icing sugar and/or cinnamon.
Serve with your favourite syrup and fruit. You can experiement with different kinds breads as well like yummy cinnamon raisin bread. Mmmm...

Tip for picky eaters: DD2 sometimes gives a hard time eating eggs so I make this recipe only using one egg and once slice of bread. I'll leave the bread in the egg mixture until it is completely saturated and then fry. This way, she'll eat an egg and not even know it...is that called cheating??

My Desi Turkey and Gravy


Well, since my search for recipes was inspired by the "All-American" (or Canadian) turkey dinners, I thought I it would make sense to post "My Desi Turkey" as the first post on this page. "Desi" loosely means anything from the Indo-Pak subcontinent.

Please note, the recipe below is written for every 2 lbs of meat. So, if you have a 14 lbs turkey, multiply this recipe 7 times. You don't necessarily have to "multiply" it using a calculator but repeat it 7 times while you are adding the spices to your bowl. I just found it most convenient keeping the recipe this way.

All of these spices can easily be found in your local Indian/Pakistani grocery shop or even in the international section of your main grocery store. The soy sauce and chili garlic sauce is not actually "desi" but its from oriental cooking. You can find it in your main grocery store. The oven bag is a wonderful little thing. It works wonders and reduces your cooking time to just about 2 hours! I can't live without this. The turkey comes out juicy on the inside and crispy on the out. Just find it in the grocery section where you they carry foils, plastic wraps, etc.

Be prepared, this is loaded with spices and is not your conventional recipe.... :) You can tone down the red chili powder to your liking or just omit it all together. Enjoy!

1 1/2 tsp garlic powder, granulated
1 tsp ginger powder
1 tsp black pepper, ground
1/2 tsp salt
1/4 tsp turmeric powder
1/2 tsp red chili powder (optional)
2 tsp lemon juice
2 tsp soy sauce
1 tsp chili garlic sauce
water

1 oven bag
1 roasting pan or large foil pan

  1. Clean your turkey and remove any excess fat. Loosen the skin from the meat using a wooden spoon and carefully make deep cuts in the breast, thighs and legs. (This will allow the spices to get into the meat really well).
  2. Mix all of the above ingredients in a bowl except for water. Slowly add water until all spices become a uniformed, thick paste.
  3. Using your hands, apply the paste under the skin and into the slits and cuts. Rub the paste on the skin as well. Rub it in well.
  4. Cover and place into the refrigderator overnight.
  5. When you are ready to cook the turkey, remove it from the refridgerator and let sit.
  6. Preheat oven to 350 F.
  7. Prepare your pan and place an oven bag in the centre. Carefully open the bag and slide the turkey into the oven bag. Follow manufacturer's directions and seal closed with the provided tie. You will have to cut a few tiny slits on the top of the oven bag for steam to escape.
  8. Place in the oven and roast according to the manufacturer's directions. (Note: it usually takes a 14 pounder to roast to perfection in about 1.5 to 2 hrs, HONEST!).
  9. Place the roasted turkey in a nice pan, cover and place on the side.
  10. Remove the excess turkey juice from the roasting pan, discard the fat drippings and place in a sauce pan. Let simmer on stove on medium.
  11. In a small bowl, add some cornstarch with cold water. Mix until uniform.
  12. While stirring, add the cornstarch paste into the sauce pan. Cook until the gravy becomes thick and dark. Serve with your turkey!
If anyone tries this, please let me know how it turned out. You can also do this to a whole chicken and it tastes great!

Slipstitch

This is a very handy stitch when you are finishing off your stuffed toy, cushion, double-lined handbag and so on. It simply joins two folded egdes of fabric together. The final finish is clean and you cannot see the stitch as though it's become...invisible! All you need is your project, a hand-sewing needle, and thread.

First, thread your needle and make a knot at the end. Then insert the needle through one of the folded edges of the fabric about 1/4 inch and then pull the needle out. Now insert the needle through the opposite folded edge and after 1/4 inch pull the needle out. Go back to the first folded edge, insert the needle and pull out after 1/4 inch. Continue this zigzag pattern until desired length. Fasten off with a knot and trim the excess loose threads. If the knot is visible, simply tuck it in using the tip of your needle. Now you are done!

Friday, January 21, 2011

First Post!

Wow, this is my first blog. I'm a little nervous and excited. Let's see how this goes...